The function in the Folder Options dialog to Save the current folder format now uses a dialog rather than a drop-down menu, making it easier to choose what you want to save the format for.
There are three main options when saving a format:
Save format for this folder: The format will be saved for this specific folder (the one currently displayed in the file display). If you turn on the Replace this folder’s format… option , Opus will search through all your saved Lister layouts, saved folder tabs (and styles), and any currently open folder tabs for this folder, and update their format as well. The Save for all sub-folders option causes the Use as the default format for all sub-folders option to be turned on in the saved format.
Save format for all folders: The format will be saved as the new User Default format, which is used for a folder that doesn’t have a specific folder format saved for it. If you turn on the Clear any saved folder formats option, and folders for which you’ve previously saved a specific format will be reset. And the Replace the folder format… option causes any saved layouts, tabs and styles to also have their formats reset.
Save a favorite format: This lets you save the format as a favorite format (either a new one, or over the top of an existing favorite).
The old Custom format has been renamed to User Default to try to make its purpose clearer (that is, a default format defined by the user).
The “hard-coded” default format (basic Name/Size/Type/Date/Attributes) is now referred to as Factory default (this really only crops up in a few places, like the Reset Page drop-down at the bottom of the Folder Options dialog).
Under the Folder > Folder Formats menu in the default Menu toolbar there are new reset options, including Reset to folder’s format, which undoes any changes you've made and resets things as if you had opened a fresh window and gone to the folder.
The old drop-down category list for available columns is gone, and the list of columns is now split into groups in the list itself.
The categories themselves have been expanded and reorganised to make it easier to locate the columns you’re looking for. (These new categories are also reflected in any column lists shown in menus throughout Opus).
Under the list of available columns there’s now a filter control that lets you filter the list of columns by name.
In Opus 11 grouping was enabled (and the column to group by chosen) from the list of displayed fields; however, it’s possible to group by a column that’s not actually displayed and the old user interface didn’t allow this.
Grouping is now controlled using a separate setting at the bottom of the
Columns tab. The current group column is displayed, if any, and to clear
it click the  symbol. To group by a new column,
select the desired column in either of the two column lists above, and click the
arrow button. You’ll notice that the arrow button changes between
symbol. To group by a new column,
select the desired column in either of the two column lists above, and click the
arrow button. You’ll notice that the arrow button changes between  and
and  depending on which list was most recently
active – this is a visual cue to indicate which list the group column will be
set from when the button is clicked.
depending on which list was most recently
active – this is a visual cue to indicate which list the group column will be
set from when the button is clicked.
The Reverse order option lets you set the initial group order (how the individual groups are arranged) to the reverse of the default, and Collapsed is a new option that lets you have the groups start out as collapsed.
The list of displayed fields has new options for controlling the widths of columns.
Column widths have always been slightly complicated by the fact that the Auto-size all columns option is hidden away on another tab (the Display tab). In Opus 12 we’ve tried to improve this by making it more obvious when column widths are being controlled by the global option, and also making that option turn itself off automatically as soon as you edit a column width manually.
If the Auto-size all columns option on the Display tab is turned on, all columns will be shown with their widths as Auto (and grayed out to indicate that option is in effect):
As soon as you edit the width of a field, the Auto-size all columns option is automatically turned off. All the other columns will still show their widths as Auto, but it won’t be grayed out any more – this indicates that the column’s width is specifically set to Auto rather than the global option overriding.
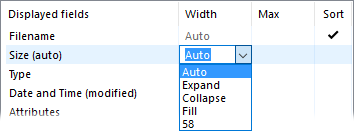
If you click the Width field of one of the displayed columns, you now see a drop-down menu with a number of width options available:
The options are:
Auto: Automatically size this column. This has the same effect as the Auto-size all columns option on the Display tab, but lets you apply it on a per-column basis.
Expand: Automatically sizes the column the same as Auto. The difference is the widths of Expand columns are ignored in the calculation of Fill columns(see below), and columns set to Expand will go off the right hand side of the file display rather than making Collapse columns start to collapse.
Collapse: Automatically sizes the column, but its width is able to collapse (down to zero width if necessary) to allow other fields to fit without horizontal scrollbars appearing. For example, you might want the Description column displayed, but not have it force other fields off the edge of the file display. Setting it to Collapse means it will only appear if there’s space for it.
Fill: Columns set to fill will be automatically sized to fill any available horizontal space in the file display. If there is more than one Fill column they divide the available space between them. Columns set to Fill can potentially end up wider than they need to be (contrast with Auto + Fill described below).
You can also enter a desired pixel width into the Width field.
If you're using the new Fill, Expand and
Collapse column modes, you may want a quick way to switch
everything to auto-size. The following script auto-sizes all columns if any have
their widths restricted, and otherwise will reset the folder format (including
columns and column widths) to what a new window would show for the
folder.
Script Type: JScript
function OnClick(clickData)
{
    var anyColumns = false;
    var cmdLine = "Set COLUMNSADD=";
    for(var e = new Enumerator(clickData.func.sourcetab.format.columns); !e.atEnd(); e.moveNext())
    {
        var col = e.item();
        if (!col.Autosize || col.Max != 0)
        {
            if (anyColumns) cmdLine += ",";
            cmdLine += col.Name;
            cmdLine += "(!,a,0)"; // Keep position. Auto-size. No maximum.
            anyColumns = true;
        }
    }
    if (!anyColumns) cmdLine = "Set FORMAT=!folder";
    clickData.func.command.RunCommand(cmdLine);
}
Columns that are set to automatically size (Auto, Expand or Collapse) can also have a maximum width set using the Max field.
You can enter a maximum size in pixels. For a column set to Auto width you can also choose Fill for the maximum, which makes it auto-size up to but not beyond the width of the file display (to avoid horizontal scrolling), but unlike setting Fill for the width it won’t auto-size larger than it needs to be.
There are two new options on the Display tab:
Manual sorting: Lets you enable manual sorting in a folder.
When grouped, combine groups with only one member into the “Other” group: When enabled, and the file display is grouped, any items in a group by themselves will instead be shown in a group called Other (prevents cluttering up the folder with lots of groups containing only one file).
The old Filters tab has been split into two – Hide Filters and Show Filters. Other than the outcome of the filter these tabs are identical.

Options have been added to the File names and Folder names options to use regular expressions as well as standard wildcards.
The attributes options are now presented as a list showing the full attribute names rather than checkboxes with the single-letter abbreviation of the previous version.
Folders / Folder Formats: The old Default Formats section has been renamed to Folder Type Formats (as these are formats that are used for certain types of folders). The User Default format (which used to be called Custom) is now in a section by itself at the bottom of the list.
Folders / Folder Formats: Wildcard Path formats now have an Expand aliases option. If this is turned on then Opus will attempt to expand folder aliases and environment variables in the entered string before performing the pattern matching. For example, /$Data (which is a folder alias for a drive called Data) would let you create a folder format that applies to a drive labelled Data no matter what drive letter it has.
Set SAVEFORMAT: Lets you save the current folder format without going through the Folder Options dialog.
Set COLUMNSADD and COLUMNSTOGGLE: When specifying the
size for fields added with these commands, you can now use a for
Auto, f for Fill, e for Expand and c
for Collapse. For example, to add the picture width field with
its width set to auto, you might use Set COLUMNSADD
picwidth(*,a).
You can also specify the maximum width with an
additional parameter; e.g. to add the picture width field with its
width set to auto and maximum width set to fill, you might use Set
COLUMNSADD picwidth(*,a,f).
Set SHOWFILTERFILENAME and similar commands: You can now use a regular expression with these commands by specifying regex: as a prefix (e.g. Set SHOWFILTERFILENAME regex:^tmp\.)
Set GROUPCOLLAPSE: When the file display is grouped, this command can be used to expand or collapse groups by name.
Set COMBINESINGLEGROUPS: Lets you control the state of the When grouped, combine groups with only one member into the “Other” group option.
Set FORMAT and Print FOLDER FORMAT: As well as accepting the
name of a favorite format, the FORMAT argument for both these commands
accepts the following special keywords:
!factory: Reset to factory defaults.
!user: Reset to the user default (in Opus 11 this was !custom, which still works for compatibility).
!default: Resets to Folder Type format applicable to current folder.
!folder: Resets to the format for the folder that a brand new window would use.
!current: Only useful for Print FOLDER FORMAT=!current – uses the current format shown in the Lister.
The Column object has new properties to expose the new column width options (autosize, fill, expand, collapse, max).
The Format object has four new properties which indicate whether the file and folder filters are set to regular expression mode (hide_files_regex, hide_dirs_regex, show_files_regex, show_dirs_regex).