The toolbar and context menu in the standalone image viewer are now fully configurable, just like all other toolbars and menus. Additionally, you can create hotkeys that are only active in the viewer.
To edit the toolbar in the viewer, simply select the Customize Toolbars command from the Edit menu, just like in a Lister. The viewer context menu can be edited from the Context Menus tab in the Customize dialog, and you can also create viewer-specific hotkeys on the Keys tab.
The default viewer toolbar is called Image Viewer, but you can select another toolbar to use from the Viewer / Appearance page in Preferences. You might want to do this if, for example, you want to create your own toolbar but leave the default toolbar unchanged.
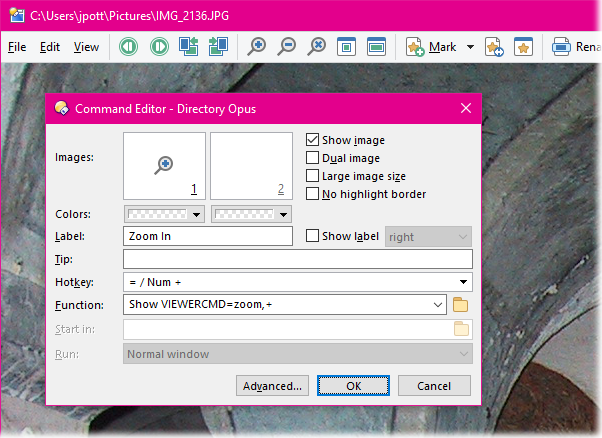
To support a configurable toolbar a new command, Show VIEWERCMD, has been added which is used to invoke all the internal functions of the viewer. These commands only work from a viewer toolbar, menu or hotkey – they will have no effect if you try to run them in a Lister. You can see from the above screenshot that the command corresponding to the Zoom In function is Show VIEWERCMD=zoom,+. A full list of VIEWERCMD commands is shown in the Commands Reference section of this document.
Although the Show VIEWERCMD command only works inside the viewer, this doesn’t mean it’s the only command that does – all other Opus commands and external functions also work inside the viewer. Of course, some commands (for example, Select) are not applicable to the viewer, but it’s certainly possible to use commands like Copy or Rename, or have buttons that open the current picture in, say, Photoshop.
The @if directive can test the state of various Show VIEWERCMD options when used within the viewer. For example, the following function would toggle between 100% zoom and Grow To Page modes:
@if:Show VIEWERCMD=zoom,reset
Show VIEWERCMD=zoom,grow
@if:else
Show VIEWERCMD=zoom,reset
A common task is sorting through a bunch of digital photos, working out which ones to keep, which ones to upload, which ones to print, etc. You might recognise this as the old function in Opus 11 called “Tag”, which let you select a picture in the viewer and have its checkbox in the Lister automatically turned on. While this system worked it was a bit clunky – firstly, the Lister had to remain open and in the same folder the whole time, and the checkbox state was easy to lose by, e.g., accidentally pushing F5 or changing the folder. Additionally, the state wasn’t persistent – so you really had to finish going through a whole photo collection at once.
In Opus 12 this task has been made much easier by the new “image marking” mode. Images you mark are automatically added to a file collection, which solves all the problems mentioned above. Additionally, thumbnails of the images you’ve marked are shown in a separate panel in the viewer, and there are commands that make it easy to move around the marked images.
To mark the current image in the viewer, simply push the M key (or click the Mark button on the toolbar). With the default configuration, a file collection will automatically be created based on the name of the image’s parent folder. On the left of the viewer window the marked image pane opens automatically, showing thumbnails of the images you’ve marked. When this opens it automatically checks the collection for any images you may have already marked in a previous session.
If the current image you’re viewing is marked this is indicated with a star icon in the top-left corner, as shown in the above screenshot.
You can jump around the marked images by double-clicking their thumbnail. The marked image pane also lets you rename images by selecting their icon and pressing F2. The following keys relating to marking are also defined by default in the viewer:
M / Insert: Mark / unmark the current image
Ctrl + M: Show or hide the marked image pane
Ctrl + Left: Jump to previously marked image
Ctrl + Right: Jump to next marked image
Ctrl + Up: Jump to first marked image
Ctrl + Down: Jump to last marked image
Ctrl + Space: Return from jump to last viewed image
Shift + M: Exchange mark with previously marked image
These keys make it very easy to jump back and forth between images you’ve marked and your current “position” in the list of images. The Exchange mark command comes in handy when you’ve got multiple photos of the same scene and you’re trying to decide which is the best. You might have marked the first photo because you thought it was ok, but then two or three photos later you find one that’s slightly better – simply press Shift + M to unmark the previous one and mark the new one instead.
If you want to take a break from your session you can simply close the viewer and come back to it later – all images that you’ve marked will be saved in the file collection. When you’ve marked one or more images and you close the viewer, Opus will automatically display the file collection for you in a new tab – you can change this behaviour in Preferences.
The name of the file collection can be configured on the Viewer / Behavior page in Preferences. When you configure the collection name, you can use the special code %F to insert the name of the parent folder, and %D to insert the current date. You can also have Opus ask you for a collection name before each marking session. And if you like you can disable the file collection behaviour and return to the old checkbox-based method, although this then has all the drawbacks mentioned above.
The image viewer is now exposed via a simple scripting interface. All currently open viewers can be enumerated using the DOpus.Viewers property – this returns a collection of Viewer objects. You can also determine the last active viewer using the DOpus.Viewers.lastactive property.
The Viewer object implements the following properties:
left / top / right / bottom: window position.
foreground: True if the viewer is currently the foreground (active) window in the system.
lastactive: True if the viewer is the last active viewer.
files: returns a collection of Item objects representing the images in the viewer’s list. Each Item object has a current property that will be True if this is the currently displayed image.
current: returns an Item object representing the currently displayed image.
The Viewer object also implements the following method:
command(cmd): Run a command in the context of this viewer. You can either pass a full Command object, or a string. If you pass a string it must be a valid keyword for the Show VIEWERCMD command (e.g. to move to the next picture, you would simply pass the string "next" which equates to the command Show VIEWERCMD=next).
The viewer can now show the Metadata pane to display and edit metadata for the current image. This works very similarly to in the Lister. To display or hide the metadata pane, press the F9 key.
As in the Lister, click the Apply link at the top-right of the pane to save any metadata changes you’ve made. You can also turn on the checkbox next to the Apply link to have changes saved automatically when you move to the next picture or close the viewer.
The viewer now has a read-ahead cache, which can make things feel much more fluid when viewing a number of images. While you’re looking at one picture, the viewer will be loading the next and previous pictures in the background, so that they’re ready to display almost immediately when you move on.
In the Edit menu there’s a new Reselect command. This sets the selection to the same rectangle that was most recently selected in any viewer window (whether open or closed), which is handy for cropping the same part of multiple images.
When the File / Convert Image command is run in the viewer, the conversion tool now gets the image data directly from the displayed image – meaning any rotation or cropping you’ve done will be reflected in the converted image. This uses the new @useimagedata command modifier and can be overridden for an individual command using the NOUSEIMAGEDATA argument (which would let you configure a viewer toolbar button to not behave like this if needed).
On the Viewer / Appearance page in Preferences, it’s now possible to configure a minimum width for the viewer window when the Auto-size option is turned on. You might want to use this to make sure your toolbar (or a certain amount of it) is always visible when viewing small images. You can set the minimum width automatically from an existing viewer window using the View / Save Minimum Width command in the default toolbar.
In Opus 11 you could configure the behaviour of the left and middle mouse buttons from a list of predefined functions. Opus 12 adds a text field letting you specify your own command as well as choosing from the drop-down list. You can now also have a command that runs on left double-click.

