
The Rename dialog has been redesigned both to work better and to introduce a number of new features to make batch renaming easier.
The new dialog has five distinct sections:
The left panel is the presets list, where you can load and manage your rename presets.
The top section controls the mode (standard / find and replace / regular expression) and lets you edit the old name and new name (or find and replace) strings.
The actions section controls the transformations that will be applied to each filename. See below for a description of the powerful new macro operations option. The script edit button is used to expand the dialog to reveal the rename script editor.
The options section contains several checkboxes that control the rename operation. New in Opus 12 is the rename folders as well as their contents option.
Finally, the preview section displays a preview of the transformed filenames. In Opus 12 the preview list is always displayed. Each file listed in the preview list (except for those from sub-folders) has a checkbox that you can use to remove the file from the rename operation. The preview list also doubles as the macro builder, which is described below.
At the bottom of the dialog, a new Apply button allows changes to be applied to the selected files while leaving the Rename dialog open. Once you use the Apply button the Undo button next to it becomes available, allowing you to undo the rename you just applied.
The buttons above the list let you manage your saved rename presets. To load the settings from a preset, you can either click the Load button or double-click the preset’s name in the list. The title bar of the Rename dialog will display the name of the currently loaded preset. Opus 12 will also notice if you’ve made changes to a loaded preset and ask if you want to save the changes before closing the Rename dialog.
The drop-down Preset Management menu provides various commands for managing your presets (you can also right-click a preset to display its context menu).
Each preset in the list has a star icon displayed next to its name, which you can click to designate that preset as a favorite. Favorite presets are displayed at the top of the preset list, and are also displayed separately in dynamically generated toolbar lists (the Rename PRESET=!list command has new parameters to control this). You can also assign each preset to a group to visually separate them in the preset list.
The new macro operations feature provides a way to add and remove text to and from filenames without needing to resort to wildcards.
As well as displaying a preview of the rename operation, the preview list at the bottom of the Rename dialog also doubles as a macro builder. You can edit file names directly in the preview list, and doing so generates macros which batch-rename all the files in the same way.
To use the macro builder, make sure the Use preview list to build
macros option is turned on.

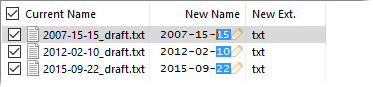
For example, say we have a bunch of files whose names are in the format YYYY-MM-DD_draft.txt, and we want to rename them as Final DD.MM.YYYY.txt – removing the “_draft” suffix, swapping the order of the date fields around and inserting “Final” at the start of each filename.
To do this with wildcards would require a complicated regular expression, but a macro makes it easy. You simply pick one of the filenames and edit it inline just like you would if you were renaming a single file – select areas of text, cut them to the clipboard, paste them in somewhere else, select another area, delete it, type some new characters, and so on.
The macro builder will record your actions as a macro expression and apply the same changes to all selected files.
To build a macro, simply click on a filename in the New Name column of the preview list (or press the F2 key). At this point, any keys you press will be recorded as an expression in the macro operations field (although you don’t need to understand the macro language, it’s described in reference section for completeness).
The pencil icon ( ![]() ) indicates the current anchor position – that is, which end of
the filename subsequent actions will be relative to. In the screenshot above,
the anchor point is set to the right. To change the anchor position, you can
double-click the pencil icon with the mouse, or position the cursor at the other
end of the name and then press the cursor key (Left or Right)
corresponding with that direction. You can also double-press the Home or
End keys.
) indicates the current anchor position – that is, which end of
the filename subsequent actions will be relative to. In the screenshot above,
the anchor point is set to the right. To change the anchor position, you can
double-click the pencil icon with the mouse, or position the cursor at the other
end of the name and then press the cursor key (Left or Right)
corresponding with that direction. You can also double-press the Home or
End keys.
When you select a range of characters using the mouse or Shift plus the cursor keys, the equivalent range is shown as selected in all other files in the preview list – so you can check that your selection is correct before committing it.
In the above example, you can see that the original _draft suffix has been removed – we did this by putting the anchor at the right end of the name, selecting left 6 characters and pressing the Delete key.
At the point the screenshot was taken we’ve selected the last two characters in the name by pushing Shift + Left twice, and the next step is to press Ctrl + X to cut those characters to the clipboard. This will generate the next macro expression R0X2. And so on, until the macro is complete. You can check the preview list at all stages to make sure the macro’s having the desired effect on all the selected filenames – if some files are showing incorrect results you can always skip them by turning off their checkboxes.
Video example: Rename Macro Builder (YouTube)
If Use preview list to build macros is turned off, the preview list lets you edit the new filenames individually. This is great for making small changes to names which the macro (or other batch operations) may not have got exactly right. Once the name for a file has been edited directly it will be displayed in red and the name is locked in until the rename operation occurs (or until you clear the custom name).
Click the Edit button in the actions section of the dialog to
display the in-built script editor.
Compared to Opus 11 the obvious difference is that the script editor appears to the right of the Rename dialog rather than at the bottom. This layout change reflects the prevalence of widescreen displays where there is often more horizontal space than vertical. The width of the script editor can be adjusted using the splitter control between it and the main rename dialog.
The script editor also displays an output log which will show any error messages generated by the script, as well as any text the script prints to the log using the DOpus.Output method.
The script language can be changed using the Script Type field in the toolbar at the top of the editor. Each language can have a default script saved for it that becomes the template for new rename scripts. Opus ships with default templates for JScript and VBScript and you can add your own (and overwrite the ones we supply) using the Save As Default command in the drop-down attached to the Default button.
Click the Hide button in the actions section of the rename dialog to hide the script editor – note that if you defined a script it will remain active even though the editor is hidden. When script is defined the Edit (Hide) button has a drop-down command that lets you quickly clear the script.
In Opus 12 rename scripts can add their own fields to the rename dialog itself, by implementing the OnGetCustomFields method. This lets you provide one or more controls that users can use to pass parameters to your script. Users can also feed parameters to your script using the new SCRIPTARG argument for the Rename command.

Custom fields can use checkboxes, string fields, number fields and drop-downs.
To add custom fields from your rename script, implement the OnGetCustomFields method. The above fields were added using the following code (in VBScript):
Function OnGetCustomFields(ByRef getFieldData)
' Add the custom fields
getFieldData.fields.my_option = True
getFieldData.fields.my_field = ""
getFieldData.fields.my_value = 20
getFieldData.fields.my_combo = DOpus.Create.Vector(1, "Option 1", "Option 2",
"Option 3")
' Assign labels to them
getFieldData.field_labels("my_field") = "My String Field"
getFieldData.field_labels("my_option") = "My Option"
getFieldData.field_labels("my_value") = "My Integer Value"
getFieldData.field_labels("my_combo") = "My Dropdown"
' Set cue text for the text field
getFieldData.field_tips("my_field") = "Enter your text here"
End Function
Custom fields are defined in much the same way as Script add-in defines its configuration using the ScriptConfig object. The OnGetCustomFields method is passed a GetCustomFieldData object. Fields are added by assigning properties of the GetCustomFieldData.fields object to the variable type you want the field to use (e.g. assign True or False for a Boolean, a string for a text string, etc.). The value you provide will become the default value for the field.
Each field can also have a label, and text fields can have a “cue banner” which is shown when the text field is empty (as seen above). Two Map objects are provided (GetCustomFieldData.field_labels and GetCustomFieldData.field_tips) which allow you to assign these.
The Rename dialog will expand automatically to accommodate your custom fields – obviously, screen space isn’t infinite, so you shouldn’t add too many fields or the dialog will grow too big for the screen!
The values that the user enters into your custom fields are provided to your OnGetNewName method via the CustomFieldData object passed as the GetNewNameData.custom. Each field you add in OnGetCustomFields will appear as a property of this object. For example, this function will print the provided values to the output log.
Function OnGetNewName(ByRef getNewNameData)
DOpus.Output "Option: " & getNewNameData.custom.my_option
DOpus.Output "String: " & getNewNameData.custom.my_field
DOpus.Output "Number: " & getNewNameData.custom.my_value
DOpus.Output "Dropdown: " & getNewNameData.custom.my_combo
OnGetNewName = True ' skip rename
End Function
When the user automates the Rename command to run your rename script directly (using the PRESET argument), they can use the new SCRIPTARG parameter to pass data for your custom fields through. This argument accepts multiple name:value pairs. For example, assume the above script was saved as the rename preset “MyRename”. The user might run the following command:
Rename PRESET MyRename SCRIPTARG my_option:True my_field:moocow
The ignore extension option causes the rename function to ignore file extensions when performing wildcard or batch transformations. With this enabled you can perform regular expression or wildcard renames without having to worry about preserving the file extension in your wildcard pattern. An additional advantage is that the same wildcard patterns can now be used for both files and folders.
The new macro operations function is discussed above.
When performing a recursive rename using rename files in selected sub-folders there are two new options available:
Rename folders as well as their contents lets you rename folders as well as any files within the folders. The ignore extension option is particularly useful in this situation, as it makes it easy to use one wildcard pattern that applies to both files and folders.
Show preview of sub-folder contents adds the contents of any sub-folders to the rename preview list. This lets you see exactly what the rename operation will do.
The new {parentbase} code is similar to {parent} except it returns the name of the base folder rather than that of the file's parent. This is most useful with a recursive rename, where the name returned by {parent} would change for files inside sub-folders.
If you want to use rename to move files into new folders, adding $.\ at the start of the new name lets each file be moved relative to the base folder rather than its parent.
Rename has new clash-avoidance technology that can prevent problems during batch renames. If the new name of a file would clash with an existing filename Opus will re-order the list of files to remove any dependencies. The rename matching filenames as one option has also been improved to work more reliably.
The following options have been superseded and removed.
In Opus 12, Rename will notice when you use fields like {picwidth} in the new name field and automatically generate file information without an option having to be specifically turned on.
This option (which only affected find and replace mode) has been replaced by ignore extension. Where you might have previously turned include file extension on, you should now turn ignore extension off (and vice versa).
In Opus 12, if a rename script has been defined it will always run, whether the script editor is currently displayed or not. That is, the Rename dialog is always in “script mode”, but the display of the script editor is optional. This lets you use rename presets based on scripts without needing to have the script editor displayed all the time.

