Filtered Operations
Normally when a command acts on a folder, the entire contents of that folder
are processed as well. For example, if you select a folder and click the
Copy File button, that folder including all of its contents are
copied.
File filters let you control which items within folders are processed. You
might want to only copy the image files from sub-folders; or you might want to
delete any .tmp files but leave all others unaffected. You can
use a file filter to accomplish this.
There are a number of functions that support the use of file filters:
- Copy Files: When copying or moving files,
filtering is enabled by selecting the Copy Filter option in
the drop-down attached to the Copy Files button. The copy
filter is local to the Lister, and it remains enabled in that Lister until it
is turned off or the Lister is closed.
- Delete: When deleting files, filtering is
enabled by selecting the Delete Filter option in the
drop-down attached to the Delete button. The delete filter is
local to the Lister, and it remains enabled in that Lister until it is turned
off or the Lister is closed.
- Find Files: The advanced mode of the Find Files tool uses a filter to define the
search parameters.
- File Selection: The Advanced Selection dialog
lets you select, deselect and hide files in the current file display using a
filter.
- Synchronize: The Filter option in the
Synchronize
tool lets you use a filter to control how synchronize handles
sub-folders.
- Duplicate File Finder: The Filter option
lets you control which files are compared when searching for duplicate files.
- Attributes: The Attributes command in the
drop-down attached to the Properties button lets you use a
filter when applying attributes to the contents of sub-folders.
- Print Folder: The Print / Export Folder Listing command in
the Tools menu lets you use a filter to control which files
are printed to the list.
- Labels: You can use the Labels system to automatically color
or highlight files and folders that match complex filters.
When using a filter in a function, there are two ways to define it:
- You can define the filter at the time you actually use it. Functions that
let you specify a filter through their user-interface also let you edit it.
You can start with a pre-saved one, or build one up from scratch.
- You can select a pre-configured filter from a drop-down list. Filters can
be pre-configured and stored using the Filters Preferences page. This lets you build up
a repository of useful filters that can be accessed easily throughout the
program.
Several of the internal
commands let you specify a filter on the command line (for example, the
FILTER argument for the Copy command lets you invoke it with the name of
a filter). In this case, the filter must have been pre-configured and
stored.

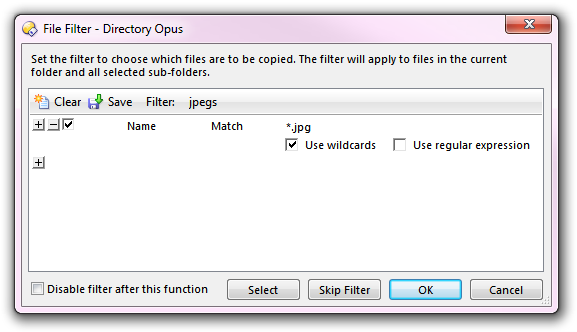
This is an example of a dialog that uses the filter control. This
particular dialog is displayed when you run the Copy File
function and the Copy Filter option is turned on. Opus
displays the filter dialog at the beginning of the copy process, and you
can define a new filter in place, or select a pre-configured one from the
Filter drop-down.
The Clear ( ) button in the
toolbar at the top of the filter control lets you quickly clear the existing
filter. If you hold the Shift key down when you click the
Clear button the filter will be reset to a simple template
filter with some common conditions added.
The Save ( ) button lets you save
the current filter definition as a pre-configured filter; it will then appear in
the Filters page in
Preferences.

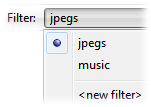
The Filter drop-down button lets you quickly access a
pre-configured filter. In the screenshot above, the jpegs filter has
been chosen. Select the <new filter> item from the drop-down to
create a new filter (this has the same effect as clicking the Clear
button.
Below the toolbar in the above screenshot is the area where the filter itself
is defined, and below the filter control are some controls that are specific to
the Copy or Delete filters:
- Disable filter after this function:
This lets you have the filter (copy or delete)
disabled automatically at the completion of the current function (otherwise
the filter will remain in force until you turn it off manually).
- Select: This button takes the current filter
definition and uses it to select all matching files and folders in the current
file display. This lets you see what the results of the filter would be on the
current folder before running the command.
- Skip Filter: Skips the use of the filter for the current
operation, but the filter will remain turned on (unless you also turned on the
Disable filter after this function option).
Again, these options only apply to the copy and delete filters. When you use
filters in other functions (for example, the Find or Synchronize tools), these options
will not be displayed.


 ) button in the
toolbar at the top of the filter control lets you quickly clear the existing
filter. If you hold the Shift key down when you click the
Clear button the filter will be reset to a simple template
filter with some common conditions added.
 ) button lets you save
the current filter definition as a pre-configured filter; it will then appear in
the Filters page in
Preferences.