Breadcrumbs path fields preserve the previous path as a "ghost"
when going up the tree
When you navigate up the folder tree
the breadcrumbs path field now preserves the branches of your previous deepest
location in the same hierarchy as "ghost"
crumbs.

These can be very handy both
as a visual reminder of the location you last visited as well as letting you
jump back and forth between higher and lower folders in the same hierarchy. In
the above screenshot we have navigated from the Projects folder back
up the tree to the Bill folder.
Additionally, if you navigate
to a sibling of an ancestor path, and the new folder has the same descendant
hierarchy as the original ancestor, the ghost path is also
preserved.

This lets you jump
very quickly to the same relative spot in a folder tree - for example, moving
from the sub-folders of one user's profile directory to another. In this
screenshot we are about to navigate to the Ben folder, a sibling of
the ancestor
folder Bill.

The result is that the
previous deeper path remains as a ghost - clicking the
Projects crumb will return you instantly to the same folder in
the new hierarchy.
You can add noghostpath to the
Location field's arguments to disable ghost paths entirely, or instead add
nopreservepath if you wish to keep ghost paths when going up
a level but prevent them from remaining when you switch into a new directory
that has the same folders below it.
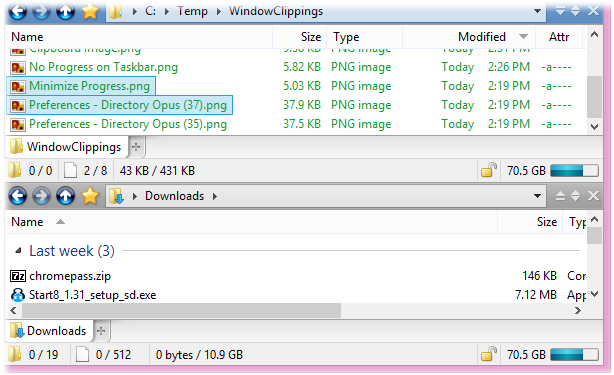
Status bars now belong to the file display instead of the
Lister
By default, status bars are now part of the file
display rather than the Lister. The most practical advantage of this is that
instead of having a single status bar at the bottom of the Lister that is
shared by dual file displays, each file display can now have its own status
bar.

As well as the obvious
advantage of being able to see both status bars at once, this also makes
configuration simpler. Instead of having one status bar definition for
single-display mode and another for dual-display, you only need the one status
bar definition for both.
The options on the Preferences /
Display / Status Bar page let you change back to the old status bar
appearance (a single bar attached to the bottom of the Lister), and you can
also combine the two (with two separate status bars side-by-side at
the bottom of the Lister, rather than inline with the file
displays).
The Find-as-you-type field can now search within
filenames
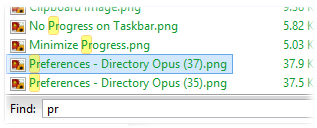
Normally the FAYT field's "find mode" only
searches at the start of the filename (e.g. if you typed "pr" in the
above folder, the only matches would be "Preferences - Directory Opus
(37).png" and "Preferences - Directory Opus (35).png"). If you
turn on the Preferences / File Displays / Find-As-You-Type / Search
anywhere in the filename option, typing "pr" in the above folder
would also match "No Progress on Taskbar.png" and "Minimize
Progress.png".
Priority is still given to matching at the start of
the filename, however, so the first match would still be "Preferences -
Directory Opus (37).png". Pressing Tab or
F3 would then step through the subsequent
matches.
Find-as-you-type matches can now be highlighted in the file
display

If you turn on the
Preferences / File Displays / Find-As-You-Type / Highlight
matches option, the file display will highlight all filenames
matching the entered text. You can configure the highlight color with the
Preferences / Display / Colors and Fonts / Files and folders - Matched
Text option.
The Find-as-you-type field now displays the number of
matches

At the right edge of the FAYT
field Opus now displays the number of filenames matching the
string you typed, as well as the match index of the current
selection.
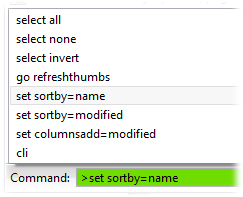
The FAYT command mode now has a history
When used
in command mode (to run Opus or external commands), the FAYT
field now preserves a history of the most recently typed
commands.

Press the
Up or Down cursor keys to access the
history.