The Columns tab of the Folder Options dialog lets you
configure which information fields (columns) are displayed for the folder when
the file display is in Details or Power mode. The selection of columns also has
an impact on other display modes like Thumbnails - even if the columns aren't
displayed, you can only sort by columns that have been enabled. The available
columns are grouped into a number of categories - you can use the filter field
at the bottom of the column list to quickly find a column by name. The fields
that aren't currently enabled appear in the list on the left, and the enabled
fields are shown in the list on the right. To move a field from one list to
another you can double-click it, drag and drop it, or use the left and right
arrow buttons between the two lists.
In the list on the right, you can change the order the columns will appear in
the file display by drag and drop or using the up and down arrow buttons. You
can also re-order columns in the file display itself by dragging the column
headers around.
The Width column in the fields list lets you specify the width for individual columns. If the Auto-size all columns option on the Display tab (see below) is turned on, all columns will be shown with their widths as Auto (and grayed out to indicate that option is in effect) - editing an individual column's width will automatically turn off the Auto-size all columns option.
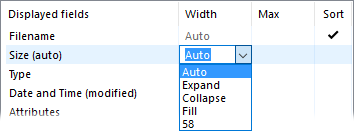
Click the Width field of one of the displayed columns to change its width. A drop-down menu appears with a number of width options available:
The options are:
Auto: Automatically size this column. This has the same effect as the Auto-size all columns option on the Display tab, but lets you apply it on a per-column basis.
Expand: Automatically sizes the column the same as Auto. The difference is the widths of Expand columns are ignored in the calculation of Fill columns (see below), and columns set to Expand will go off the right hand side of the file display rather than making Collapse columns start to collapse.
Collapse: Automatically sizes the column, but its width is able to collapse (down to zero width if necessary) to allow other fields to fit without horizontal scrollbars appearing. For example, you might want the Description column displayed, but not have it force other fields off the edge of the file display. Setting it to Collapse means it will only appear if there’s space for it.
Fill: Columns set to fill will be automatically sized to fill any available horizontal space in the file display. If there is more than one Fill column they divide the available space between them. Columns set to Fill can potentially end up wider than they need to be (contrast with Auto + Fill described below).
You can also enter a desired pixel width into the Width field.
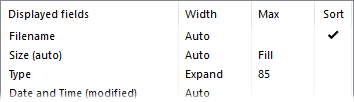
Columns that are set to automatically size (Auto, Expand or Collapse) can also have a maximum width set using the Max field.
You can enter a maximum size in pixels. For a column set to Auto width you can also choose Fill for the maximum, which makes it auto-size up to but not beyond the width of the file display (to avoid horizontal scrolling), but unlike setting Fill for the width it won’t auto-size larger than it needs to be.
The Sort column indicates which field the list will be
sorted by. If a single checkmark is shown, there is only one sort field (in the
screenshot above, we're sorting by Date modified). If a number with an
arrow symbol is shown it indicates multiple sort fields. To change the sort
field, single click in column on the desired field. To assign multiple sort
fields, click on the first field as normal, then hold either the Control
or Shift keys and click on the second field, then the
third, and so on. If you Control/Shift-click a
field that is already sorted, the direction of the sort for that field only is
changed - so you can for example sort by size in one direction and date in the
other.
Below the column lists are controls which let you choose which field (if any)
the list is grouped
by.

The current group column is displayed, if any, and to clear it click the  symbol. To group by a new column, select the desired column in
either of the two column lists above, and click the arrow button.
You’ll notice that the arrow button changes between
symbol. To group by a new column, select the desired column in
either of the two column lists above, and click the arrow button.
You’ll notice that the arrow button changes between  and
and  depending on which list was most recently
active – this is a visual cue to indicate which list the group column will be
set from when the button is clicked.
depending on which list was most recently
active – this is a visual cue to indicate which list the group column will be
set from when the button is clicked.
The options available when the file display is grouped are: