
The macro feature provides a way to add and remove text to and from filenames without needing to resort to wildcards. You can use macros to add characters, remove characters, and move characters around inside filenames.
The macro operations field displays the actual macro definition, but
luckily you don't need to understand the macro language to use it. As well as
displaying a preview of the rename operation, the preview list at the bottom of
the Rename dialog also doubles as a macro builder. You can edit file
names directly in the preview list, and doing so generates macros which
batch-rename all the files in the same way.
To use the macro builder, make sure the Use preview list to build
macros option is turned on.

For example, say we have a bunch of files whose names are in the format YYYY-MM-DD_draft.txt, and we want to rename them as Final DD.MM.YYYY.txt – removing the “_draft” suffix, swapping the order of the date fields around and inserting “Final” at the start of each filename.
To do this with wildcards would require a complicated regular expression, but a macro makes it easy. You simply pick one of the filenames in the preview list and edit it inline just like you would if you were renaming a single file – select areas of text, cut them to the clipboard, paste them in somewhere else, select another area, delete it, type some new characters, and so on.
The macro builder will record your actions as a macro expression and apply the same changes to all selected files.
To build a macro, simply click on a filename in the New Name column of the preview list (or press the F2 key). At this point, any keys you press will be recorded as an expression in the macro operations field (although you don’t need to understand the macro language, it’s described in the reference section for completeness).
The pencil icon ( ![]() ) indicates the current anchor position – that is, which end of
the filename subsequent actions will be relative to. In the screenshot above,
the anchor point is set to the right, meaning all operations are relative to the
right-end of the string. This lets you, for example, delete a certain number of
characters from the end of the filename without all the filenames having to be
the same length.
) indicates the current anchor position – that is, which end of
the filename subsequent actions will be relative to. In the screenshot above,
the anchor point is set to the right, meaning all operations are relative to the
right-end of the string. This lets you, for example, delete a certain number of
characters from the end of the filename without all the filenames having to be
the same length.
To change the anchor position, you can double-click the pencil icon with the mouse, or position the cursor at the other end of the name and then press the cursor key (Left or Right) corresponding with that direction. You can also double-press the Home or End keys.
When you select a range of characters using the mouse or Shift plus the cursor keys, the equivalent range is shown as selected in all other files in the preview list – so you can check that your selection is correct before committing it. You can range-select to the end of all names no matter how long they are by double-pressing Shift+End (or Shift+Home when the anchor is set to the right).
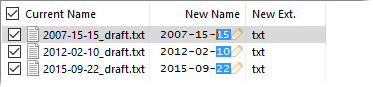
In the above example, you can see that the original _draft suffix has been removed – we did this by putting the anchor at the right end of the name, selecting left 6 characters and pressing the Delete key.
At the point the screenshot was taken we’ve selected the last two characters in the name by pushing Shift + Left twice, and the next step is to press Ctrl + X to cut those characters to the clipboard. This will generate the next macro expression R0X2. And so on, until the macro is complete. You can check the preview list at all stages to make sure the macro’s having the desired effect on all the selected filenames – if some files are showing incorrect results you can always skip them by turning off their checkboxes.
Note that in the macro builder the standard clipboard keys Ctrl+C, Ctrl-X and Ctrl-V will record those operations in the macro, and the operations will be treated separately for each filename. If you have some text on the clipboard that you want to paste into the macro "as-is" (rather than recording the paste operation itself), you need to press Ctrl+Shift+V.
If the Use preview list to build macros option is turned off, the preview list lets you edit the new filenames individually. This is great for making small changes to names which the macro (or other batch operations) may not have got exactly right. Once the name for a file has been edited directly it will be displayed in red and the name is locked in until the rename operation occurs (or until you clear the custom name).
If you're interested in the rename macro language, it's described in the reference section of this manual. Also note that the font used for the macro builder (which must be a fixed-width font) is configurable though Preferences / Display / Colors and Fonts.